Tuesday 27 September 2016

Certified Ethical Hacking [CEH v9] PDF & TOOLS [Theory,Lab & Tools] Download

Download Certified Ethical Hacking ( CEHv9 ) PDF & Tools. This is a PDF & Tools collection of CEH | V9. Read to learn How to Hack and become good Hacker. Check Hacking section for more Tutorials and Ebook For more Ebook download.

Download CEH V9 Theory

Zip Password :- t4skm4ster

CEH v9 : Certifies Ethical Hacker v9 Lab PDF Download

zip Password :- t4skm4ster

CEH v9 : Certifies Ethical Hacker v9 Tools Download

CEH v9 Tools:-

Zip Password :- t4skm4ster
And if you like this post please like & share with your friends... 
& Don't Forget To....

Like Our Facebook Page : www.facebook.com/t4skm4ster

Join Our Facebook Group : www.facebook.com/groups/t4skm4ster

Follow Us at Twitter : www.twitter.com/t4skm4ster

Follow Us at Instagram : www.instagram.com/t4skm4ster


Subscribe Our You Tube Channel : www.youtube.com/c/t4skm4ster
 Keep visiting Enjoy 

Thursday 22 September 2016

Google Allo


Introducing Google Allo, a smart messaging app that helps you say more and do more. Express yourself better with stickers, doodles, and HUGE emojis & text. Allo brings you the Google Assistant, preview edition. 

Smart Reply 

Respond to messages without typing a single word. Smart Reply learns over time and suggests responses to text and photos, in your style. 

Ink 

Get creative with the photos you send by doodling on them or adding text. 

Stickers 

Say it all with the perfect sticker. Stickers in Google Allo are designed by independent artists and studios from around the world. 

SHOUT or whisper 

No more typing in ALL CAPS to get your point across. Say it louder or quieter by changing the size of your text with a quick swipe. 

Meet your personal Google Assistant 

Google Allo brings you the Google Assistant, preview edition. Find restaurants nearby, share videos to watch, and get answers, right in your conversation with friends. Add @google to your group conversation or chat one-on-one with your Assistant. It’s your own personal Google, always ready to help. 

Incognito mode

Send messages with end-to-end encryption, use private notifications to help keep your chats more discreet, and control how long your messages stick around with expiring chats.

Screenshot

 Download

Enjoy...☺


Wednesday 21 September 2016

How To Remove Shortcut Virus From Pendrive/PC


How To Remove Shortcut Virus From Pendrive/PC t4sk m4ster

Remove Shortcut Virus From Pendrive/PC

Todays As per as we use our pen-drives and other Hard drive in our Pc/Laptops.We face some shortcuts which harm our files. So The questions arises That from where that shortcuts Comes?

What Is Shortcut Virus ?

A shortcut virus is a virus (a malware) that hides your original files inside shortcuts.The way it hides the file remains unknown though the effect is quite visible. The original files are there in the drive itself, but in such a position that you can’t recognize it nor take it out. Shortcut Virus Sometimes delete your important data.Initially, it doesn’t harms your files but later on, it may make them corrupt or even delete all the files; depends on the type of shortcut virus.Remove Shortcut Virus From PC or Pendrive

Method-1 

Remove Shortcut Virus From Pendrive/PC Using CMD/Command Prompt.

How To Remove Shortcut Virus From Pendrive/PC t4sk m4ster

1.Go to Start Type "Run" > Type "CMD"> Open Command Prompt in Administrative Mode.

2.A black Color of window is open infront of you.
3.Type in Command prompt :attrib -h -r -s /s /d <Your USB drive letter>:\*.* (See <Your USB drive letter> from My computer and then type it For ex, if your drive letter is “D” then the command is like: "attrib -h -r -s /s /d D:\*.* ")
To know about this command Type ” attrib /? ” In CMD Window.you can know more about it.
Lets Take An Example :- If My removable disk drive (pendrive) has a Latter of "F" then i have to use USB Drive Letter "D".
How To Remove Shortcut Virus From Pendrive/PC t4sk m4ster


By this simple method you can Remove shortcuts from your pendrives/pc.
While you are using this attribute your System files may or maynot be Remove some virus from FAT32 & NTFS.

Method-2

Shortcut Virus Remover : Remove Shortcut Virus Using Shortcut Virus Removers.
So Here We have many software which helps you to remove shortcut virus from pendrive/PC/SD cards. But here THE HACKiNG iNSiDE Gives you bestShortcut Virus Remover Software.

RkillVirus Remover 

-:Download link:-

Rkill Latest Software To Remove Shortcut Virus From Pendrive/PC.


RKill is a Shortcut virus Remover software designed to terminate malware processes that blocks or prevents your security software (Antivirus, Anti-malware and etc.) from running. In order that, you can start using security software again and be able to clean Your Pendrive from virus.
NOTE- RKill is not an Antivirus or malware Removal Tool, it has no power to remove malware. But it stops malicious or malware processes to help Antivirus and Anti-malware remove stubborn malware.i suggest You all to use Rkill only for removing of Shortcut virus from pendrives/PC

Friday 16 September 2016

How to Root HTC Desire 820

How to Root HTC Desire 820 

HTC Desire 820 is a good quality Android smartphone released in September 2014. The device comes with a 5.5 inch LCD touchscreen display, which is powered by a 1.5 GHz quad-core processor along with a 2 GB RAM and it runs on Android 4.4.2 KitKat operating system. The highlight of this device is its primary camera, which with 13 mega pixel lens can help you to take full HD pictures and videos easily.In today’s rooting guide we show you how to root HTC Desire 820.

Note:-

  • This guide is for HTC Desire 820 and its variants only.
  • I am not responsible for your warranty loss or device not functioning properly.

Guide on How to Root HTC Desire 820 Easily

Before you proceed any further make sure to charge your device above 40%, though we recommend a full charged device before rooting.

Step 1: Backup your Device

Backup is mandatory as this will wipe most of internal data. Backup is always recommended. Below is guide on how to backup most of your data.
Backup your Android Device.

Step 2: Downloads the following files

Here’s link to download  TWRP Recovery and SuperSu


Step 3: Enable USB Debugging 


Enable USB Debugging mode in your smartphone. To do so, first you will need to enable Developer options by following this path: Settings -> About Phone (tap on the build number for 5-7 times to enable Developer options). Once done, enable USB Debugging by following this path: Settings -> Developer Options -> USB Debugging (tap on it to enable this function)

Step 4: Unlock Bootloader

We have prepared a step by step easy to follow guide on how to unlock bootloader. This step in mandatory so you need to visit the unlocked bootloader page provided below.
How to Unlock Bootloader of HTC Devices   Click Here

Step 5: Transfer the downloaded SuperSU

Transfer the downloaded SuperSU.zip to root of device memory after downloading and the proceed to next step.

Step 6: Reboot to Fastboot mode and Flash Recovery

If device is on press Volume Down and Power Key together for about 10seconds and device will turn off. At this point leave power key but keep holding volume down and you will enter to fastboot mode.
Connect Phone to PC using data cable. Extract files from Recovery.zip in one location and simply click on flash-recovery.bat.  It will start pushing TWRP to your device and within few seconds it will show as finished.
Disconnect phone and using volume keys select recovery option and reboot to recovery and install SuperSu by selecting Install zip > and selecting supersu.zip transferred in first step to obtain root privilege.
After successfully flashing the SuperSU reboot to system and congratulation now you have proper root access.

Verify Root Access

To verify root access by installing the Root Check from   Play Store.
If you faced any trouble or have any thing to say just drop your comment below. Do share the post with friends.

Thursday 15 September 2016

How to unlock Htc Bootloader

Unlock HTC Bootloader

Unlocking the bootloader of your HTC One smartphone will allow you to root and install new custom ROMs. This is a guide that should be used by those users who want to tinker with their phone’s OS and free its OS so that you will be able to flash unofficial software for your phone. In order to make sure that you successfully complete this guide, you will need to read the guidelines below before starting the bootloader unlock process. Here’s what you need to know:
  1. use this guide only with the HTC One smartphone. Do not attempt to unlock any other Android device using the instructions listed in this post.
  2. If you unlock the bootloader of your HTC One you will lose all the data that is currently stored on it. Every single file will be wiped and you cannot retrieve it.
  3. Move all your important files to your computer using the USB data cable.
  4. The phone’s warranty will be voided after the bootloader is unlocked.
  5. Enable USB debugging option from the Android Developer Options. NOTE: If the Developer Options menu doesn’t appear, then you should open Settings, then About Phone and after that you should tap 7 times on the ‘Build Number’ area. It will unlock the Developer Options for your smartphone.
  6. If, after you unlock the bootloader, you will receive any new software updates, then you will have to deny their installation as you will end up bricking the phone after the install is complete.
  7. Make sure to download and install the HTC Sync Manager before getting to the tutorial. Download link HERE.
  8. Download Fastboot zip from HERE. Extract the zip contents into a folder named Fastboot. It would be great if you’d place the Fastboot folder on your PC desktop menu. It should feature 4 files within after the unzip is complete.
  9. Disable all the antivirus applications from running on your computer. Such application are usually interfering with the Bootloader Unlock tools.
  10. Make sure that your phone’s battery has enough power left so that it won’t power off during the process.
  11. We cannot be blamed in case something goes wrong.
  12. Read the entire post and if you’re unsure about some of the steps that you have to take, then you should ask for more help in our comments section.

How to unlock the HTC bootloader:


We have put together a detailed step-by-step instructions guide on how to unlock bootloader of your HTC device. Please read every line carefully. We suggest, read the tutorial once before actually performing it on your phone.
IMPORTANT: Unlocking your device may void all or parts of your warranty by HTC.
Step 1 – Go to HTCDev.com website.
Step 2 – Click on ‘Register’ and create an account at the HTCDev website.
Step 3 – Activate your account. Login and go to main page of HTCDev.
Step 4 – Click on “Unlock Bootloader” button and click the “Get Started” button.
Step 5 – Select “All Other Supported Models” from the dropdown list and then click the “Begin Unlock Bootloader” button.
Step 6 – Carefully read the warning popup message and then press the ‘Yes’ button.

Step 7 – Check both the boxes in the Legal Terms popup box. Now press the “Proceed to Unlock Instructions” button.
Step 8 – Download Fastboot files if you don’t already have them and extract in C:\ drive.
Step 9 – Hold the Power button on your HTC device for 10 seconds to completely turn it off.
Step 10 – Now go to Bootloader Mode on your device. How? Press Volume Down and Power to start the device into Bootloader mode.
Step 11 – Use the Volume buttons to select up or down. Highlight Fastboot and press the Power button to select.
Step 12 – Connect your HTC device to the computer via a USB cable.
Step 13 – Now open Command Propmpt. How? Click the Start button and type ‘cmd’ (without quotes) and press Enter.
Step 14 – In the Command Prompt window, type the following command and press Enter.

cd c:\fastboot

Step 15 – Now type the following command and press Enter.

fastboot oem get_identifier_token

Step 16 – You will see a long string of text (identifier token). What to do now? Open this page on HTCDev.
Step 17 – Now follow the instructions as given there to select and copy text from Command Prompt.
Step 18 – Once copied, paste that identifiertoken into the box at the bottom of that HTCDev page and then click Submit.
Step 19 – You will receive an email by HTC (on the registered email) with a link to the second part of the instructions and your “Unlock_code.bin” file attached.
Step 20 – Download “Unlock_code.bin” and save it in your Fastboot folder (C:\fastbooot in our case).
Step 21 – Now type the following command in Command Prompt and press Enter.

fastboot flash unlocktoken Unlock_code.bin

Step 22 – Check your phone. Read on-screen instructions. Press Volume Up to accept and the Power button to confirm.
That’s it. Your HTC device now has a unlocked bootloader. This means, you can install custom ROMs, flash a custom recovery and perform other system tweaks on your HTC phone now.

If u have any problem plz comment......
And if you like this post please like & share with your friends... 
& Don't Forget To....

Like Our Facebook Page : www.facebook.com/thehackinginside

Join Our Facebook Group : www.facebook.com/groups/thehackinginside

Follow Us at Twitter : www.twitter.com/thehackinginside

Follow Us at Instagram : www.instagram.com/thehackinginside

Subscribe Our You Tube Channel : www.youtube.com/channel/thehackinginside Keep visiting Enjoy 

Monday 12 September 2016

Need for Speed Most Wanted 1.3.71【CRACKED】

Need For Speed Most Wanted
Need for Speed Most Wanted is an immersive, high-quality game. Please note that it requires a 550MB+ download and roughly 1,900MB+ free space on your device. To speed things up, we recommend connecting to WiFi.

MAKE TROUBLE, GET WANTED

Evade a relentless police force while you clash with street racers. Race and chase hot cars like the SRT Viper GTS, Porsche 911 Carrera S, Hummer H1 Alpha, and many more. Feel the intensity of no-brakes-allowed street racing with realistic full-car damage for the first time on mobile.

LEAVE YOUR MARK

Log into Origin to check the Wanted List and find out who is the Most Wanted across platforms and among your friends. Then, challenge your friends and prove your racing skills in nonstop competition.

GO FROM ZERO TO MOST WANTED…

  • Drive and customize over 40 of the world’s most exciting cars
  • Race the way you want! By popular demand, you can now touch or tilt to steer
  • Use Mods to enhance your car and get ahead of the pack in style
  • Experience the action with mind-blowing graphics and intense full-car damage
  • Earn Speed Points to unlock new cars
  • Trick out your phone with an exclusive Most Wanted live wallpaper
Your rivals will do everything they can to stop you from getting to the top – but in this world, there can only be one Most Wanted.
Be the first to know! Get inside EA info on great deals, plus the latest game updates, tips & more…
VISIT US: eamobile.com/android
FOLLOW US: twitter.com/eamobile
LIKE US: facebook.com/eamobile
WATCH US: youtube.com/eamobilegames
Terms of Service : http://www.ea.com/terms-of-service
Privacy and Cookie Policy: http://www.ea.com/privacy-policy
Game EULA: http://tos.ea.com/legalapp/mobileeula/US/en/GM/
Visit https://help.ea.com/ for assistance or inquiries.
EA may retire online features and services after 30 days’ notice posted on www.ea.com/1/service-updates.
Important Consumer Information. This app: Contains direct links to the Internet; Collects data through third party analytics technology (see Privacy & Cookie Policy for details).

WHAT’S NEW

‘Rev your engines and get ready to burn some rubber! We’ve made some behind-the-scenes improvements to keep your game running smoothly.
Thanks for playing!

HOW TO INSTALL:-

  1. “APK” install it on your device.
  2. com.ea.games.nfs13_na” folder “android /data” copy into.
  3. Enter the game.

Download link :-

Sunday 11 September 2016

How to Use Jio 4G Sim in 3G Mobile ? [GUIDE] [Tips & Tricks]

JIO 4G SIM IN 3G MOBILE

Reliance the major company in India is never been so successful with their products. No one ever willing to buy their products, but all of sudden things are changes every person in India is need one product and that is Reliance Jio 4G sim. This sim comes with jio preview offer and this isn’t available to sale on online. But you can refer these 4 ways to get the Jio sim for free. Earlier in this they announced free Jio sim for the mobile worth above 10000 INR, which are only Reliance mobiles. But now they are giving free jio sim for the Lyf Flame 8 mobile which priced at 4199 INR only. In this article you can get the method for how to use reliance jio 4G sim in 3G phone.

Each and everyone need this sim, but there are some restrictions from Reliance you can’t use this for other mobile. but we indeed cracked it and gave the 4 possible solutions to use Jio sim in any 4G mobile. So here we are giving you How to Use Reliance Jio 4G Sim in 3G Phone..

How to Use Reliance Jio 4G Sim in 3G Phone :

Remember use this trick at your own risk because this Method is a little bit risky , so please do follow the exact steps , we are not be responsible for any damage which can happen to your mobile. This method will solve How to Use Reliance Jio 4G sim in 3G phone.

Method 1 - Mediatek Processor Only :

Before start using this method , check your mobile device specs whether it has mediatek chipset or not. Android version 4.4 will be more preferred i.e Kitkat version. Guys please check your android version, if that didn’t work try restarting your mobile 1-2 times by clearing cache. Incase if you have any doubts comment below, I will help you out. Guys this method is working but you should follow the exact steps, here I am giving one trick to check whether your device is running on mediatek processor on not. The method 1 steps have been changed a little bit but the process is same.

Checking Device for Mediatek or Qualcomn Processor :
  1. First Download CPU Z app from PlayStore : Click Here
  2. Install and open this app.
  3. Wait while it retrieves your device information.
  4. Within few seconds you will see all your device information on the screen.
  5. If your device is using Mediatek Chipset then it will reflect with the Logo of Mediatek Chipset on the screen.
Suggestion : You need to activate your sim before going to do this process, if you jio sim isn’t activated then check out the process from this article.
  • First Download & Install MTK Engineering Mode app from PlayStore : Click Here
  • This Application will allow you to run an advanced Setup from the Engineering Mode Menu of MTK phones, which is also called SERVICE MODE
Note This : Use this secret menu very carefully. In case if you don’t know on what you are doing then just stop it or don’t do it!!
  1. Open the installed app, or dail your mobile device specific code for Engineering Mode
  2. Click on the MTK Settings and Select Preferred Network Option.
  3. Now you can Select 4G LTE/WCDMA/GSM as network mode and you can save it and turn it off and on your mobile device
  4. Once you done the above steps, Shutdown the device
  5. Insert your Reliance Jio 4G sim in 1st Slot and keep the 2nd Slot empty.
  6. Switch on the device and then you will see jio sim network.
Holla!! Within 10 minutes you will now get the Jio Network but you will not get the 4G speed still you will get 3G speed. Which is also better..

If you got other device or above method isn’t working go with this process for Reliance Jio 4G Sim in 3G Phone trick..

Method 2 - Qualcomm Chipset Devices (Tested In Redmi 1s and Moto G Series) :

Check Your Mobile Specifications does It Has Qualcomm Chipset Or Not. Version 4.4 Kitkat Android Devices Will Be More Preferable.
  1. Download Shortcut Master (Lite) App from PlayStore : Click Here
  2. Install the app & Open It.
  3. Click on Menu (vertical Three Dots on top right side)
  4. Now Go To Menu then Search for “Service Menu” Or ” Engineering Mode “
  5. Then Select “System App” Option For Deep Search. If Found then open it and access to change LTE Bands If that doesn’t work,
  6. Once You Got the Engineering Mode , Open It and Select Change LTE Bands.
  7. If the above Doesn’t Work Then Dial *#2263# then Select Menu And Click Back Again Then Select Menu.
  8. Then Go To Key Input And Enter “0000” without quotes, Then Wait For Couple Of Seconds ,after that You Will Get Popup.
  9. Select UE Settings From that Popup, after that Select setting>protocol>NAS>Network Control>Band Selection>LTE Band> The Select “Band 40”.
  10. Hola Done Now. Now you can Insert Jio Sim & Check Whether You Are Getting Signals Or Not.
  11. Restart the Device and Place it in First Sim Slot
If You Have Any Issue Feel Free To Comment Or Contact Us, I will surely help you.. :)

Method 3 - For Other Android Users (Tested In Galaxy Grand & Moto 1st Gen.) :

Latest news as so many people didn’t understood this step so I am here to show you every steps.. Just follow the steps carefully if you have any doubts feel free to ask me in the comments..
  • First visit the Dial-pad, and type this number *#*#4636#*#*
  • Then you will see one page with Testing, click on Phone Information
How to Use Jio 4G Sim in 3G Mobile @thehackingsage
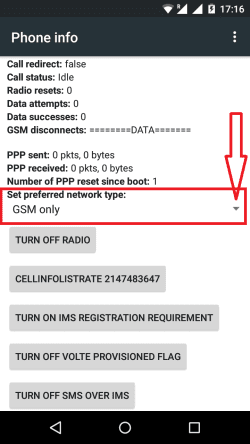
  • Scroll down till you find the Set Preferred Network Type drop down menu & click on that
How to Use Jio 4G Sim in 3G Mobile @thehackingsage
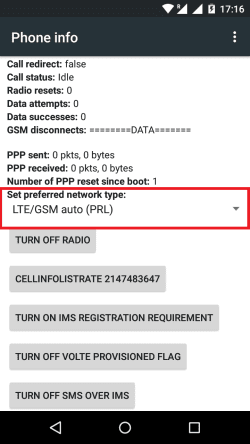
  • Select the LTE/GSM auto (PRL) option and close it
How to Use Jio 4G Sim in 3G Mobile @thehackingsage
  • Switch off your mobile put Jio Sim in slot 1 and keep the second slot empty.
  • Switch on now then you will see Jio 4G signal in your mobile..
Let me know in the comments if this didn’t work. I will surely help you out. These are the most working tricks on Reliance Jio 4G sim in 3G phones.

Note :- By Using This Trick , You Device Seems As 4G Compatible For Jio Sim But Actually It Will Receive 3G Network . This Trick Will Not Convert Your Device From 3G To 4G , It Will Only Deceive Jio Sim To Catch 3G Network On Your Device.. & Use It At Your Risk. THE HACKiNG iNSiDE Were Not Responsible If You Bricked Your Device. Before Using Any Trick, Check Your Device Specifications Then Use Trick To Use Jio 4G Sim in 3G Mobile..

and if you like this post please like & share with your friends... 
& Don't Forget To....
Like Our Facebook Page : www.facebook.com/thehackinginside
Join Our Facebook Group : www.facebook.com/groups/thehackinginside
Follow Us at Twitter : www.twitter.com/thehackinginside
Follow Us at Instagram : www.instagram.com/thehackinginside
Subscribe Our You Tube Channel : www.youtube.com/channel/thehackinginside

Keep Visiting... Enjoy !!! :)